How to Make Money Renting Your Stuff in Europe
Bikes, Cameras, Tools and More
This post may contain affiliate links. We may earn a commission at no extra cost to you.
The Bike That Was Just Sitting There
Looking at a bike in the corner of the apartment. Covered in dust. Untouched for three weeks.
Bought for €400 to commute. Then working from home became normal. The bike stayed put.
A friend’s words came back: “In Europe, people rent everything. Why not your bike?”
That afternoon, the bike was listed on Spinlister. A few photos, a short description, €15 per day. Within a week, the first booking arrived — someone renting it for a weekend.
€30 in the account. For a bike that had been doing nothing.
That is the idea behind peer-to-peer renting. You already own things. Some of those things sit unused for days, weeks, maybe months at a time. Meanwhile, someone nearby needs exactly that item for exactly that period — and would happily pay to borrow it.
This guide will show you how to make that connection work. What to rent, where to list it, how to price it, how to stay safe, and how much you can realistically earn.
What Is Peer-to-Peer Item Renting?
Peer-to-peer renting means lending something you own to another private person for a fee, through a platform that handles the booking, payment, and often the insurance.
It is different from starting a rental business. You are not buying inventory. You are not setting up a company. You are simply allowing someone to use your item temporarily — something you own already, something that would otherwise sit unused — and earning money while it does.
The person who rents your bike is not your employee’s problem or a business transaction to manage. They pay through the platform, pick up the item, return it when agreed, and the platform transfers your earnings to your account.
The platform takes a fee for providing that infrastructure. What remains is yours.
How Does It Work?
The process is straightforward and follows the same pattern on most platforms.
You list your item. You take photos, write a description, set a daily price, and specify pickup arrangements. This takes 20 to 30 minutes for your first listing and less after that.
Someone finds your listing and books it. They pay through the platform. The platform holds that money until the rental is complete.
They pick up your item. You meet at a time you both agree. You check their ID if the platform supports it, take photos together as a record of the item’s condition, and hand it over.
They return it. You check the item, confirm no damage, and the platform releases payment to your account. You leave each other a review.
Your item is available again. Same item, next renter, next income.
The items you own do not change. They just earn money during the periods you are not using them.
Why It Is Worth Considering
This approach to earning extra income has some distinct advantages, particularly in Europe.
You are monetising something you already paid for. A bike bought for €400 that rents for €15 per day for 10 days per month earns €150 per month. After three months, the bike has paid for itself. Everything after that is money you would not otherwise have.
Europe’s renting culture creates real demand. Tourists want bikes for a weekend, not a lifetime. Students need cameras for a project. Neighbours need a drill for one job. Travellers need a suitcase. The sharing economy in Europe — particularly in cities like Amsterdam, Berlin, Dublin, and Paris — is mature and active.
You do not need to buy anything. Every other side hustle discussed on this site involves creating something, learning something, or buying materials. Renting your belongings requires none of that. The inventory already exists in your home.
The income is truly passive once set up. After the listing is live, the rental happens without ongoing effort. You respond to booking requests, arrange pickup, and collect payment. The item does the work.
Platforms handle the complicated parts. Payment processing, insurance coverage, and dispute resolution are all managed by the platform. You do not need to chase anyone for money or argue over damage — the systems exist to handle exactly those situations.
What Can You Rent? The Items That Work Best
Not everything in your home is a good candidate. Some items rent frequently and at good rates. Others are rarely requested or create more hassle than they are worth.
Items that rent well:
- Bikes — one of the most consistently rented items across European cities. Tourists, commuters without their own bikes, and weekend riders create steady demand, especially in spring and summer.
- Cameras, DSLRs, and lenses — photography and video equipment is expensive to buy. Students, event photographers, and people doing one-off projects rent rather than buy.
- Drones — high-value items with enthusiastic occasional demand. Renters are typically willing to pay well.
- Camping and outdoor gear — tents, sleeping bags, hiking equipment. Strong seasonal demand from spring through autumn.
- Ski and snowboard equipment — heavy and expensive to travel with. People visiting mountain areas often prefer to rent locally.
- Power tools and DIY equipment — drills, pressure washers, ladders. Most people need these occasionally, not regularly.
- Audio and visual equipment — projectors, speakers, lighting rigs. Event organisers and home movie nights.
- Luggage and travel bags — people moving between cities or taking trips they did not plan for often need a suitcase for a few days.
- Sports equipment — surfboards, paddleboards, kayaks near water; racquets, bats, and balls for occasional players.
- Cars — the highest-value rental option, covered in detail below.
Items to approach cautiously:
- Very personal items (clothing, shoes) — hygiene concerns limit demand
- Fragile items with high sentimental value — the financial return is rarely worth the emotional risk
- Items you need to use yourself regularly — a rental that conflicts with your own plans creates complications
Which Platforms to Use
Different platforms specialise in different items. Using the right platform for your item means reaching the buyers who are already looking for exactly that.
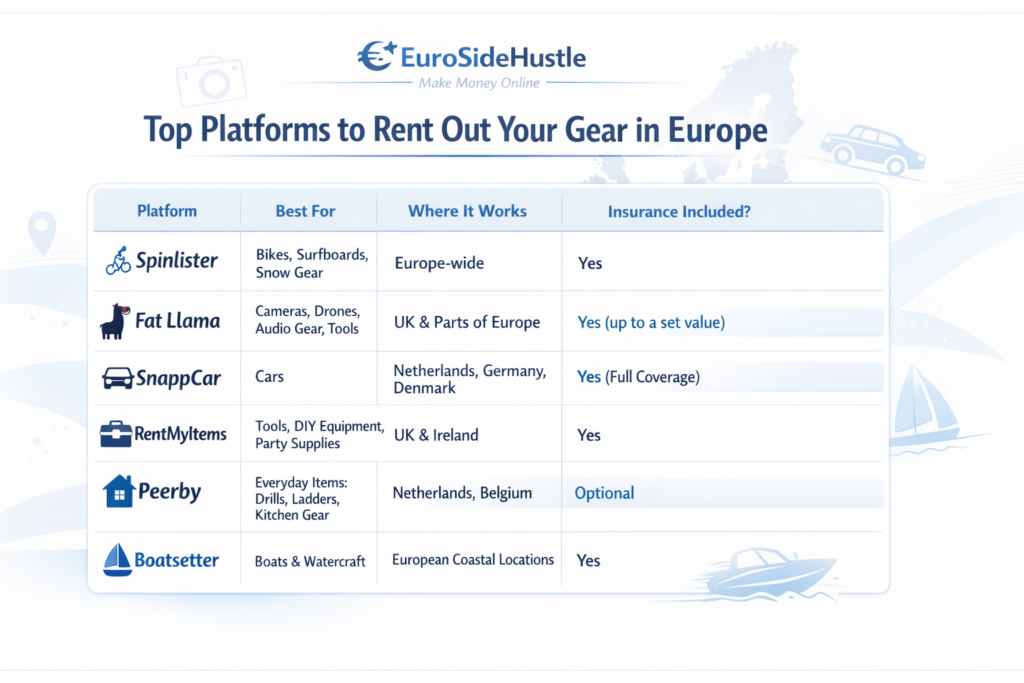
One important note on insurance: Always read the insurance terms before listing anything valuable. Platforms describe their coverage in general terms on their marketing pages, but the actual terms — what is covered, what is excluded, the claim process — are in the full policy document. Take 20 minutes to read it before your first rental. That time can save significant money if something goes wrong.
Step-by-Step: How to Start Renting This Week
Step 1 — Walk Through Your Home With Fresh Eyes
This is not a figurative instruction. Physically walk through your home and look at your belongings differently. For each item you notice, ask:
- Have I used this in the last two weeks?
- Would someone else need this temporarily?
- Is it in good condition?
- Would I feel comfortable handing it to a stranger?
Write down any items that pass all four questions. Even a short list of two or three items is enough to start.
Pay particular attention to items stored in corners, under beds, or in cupboards. These are the items most likely to be earning nothing at the moment.
Step 2 — Choose the Right Platform for Your Item
Match your item to the platform where buyers are already searching for it.
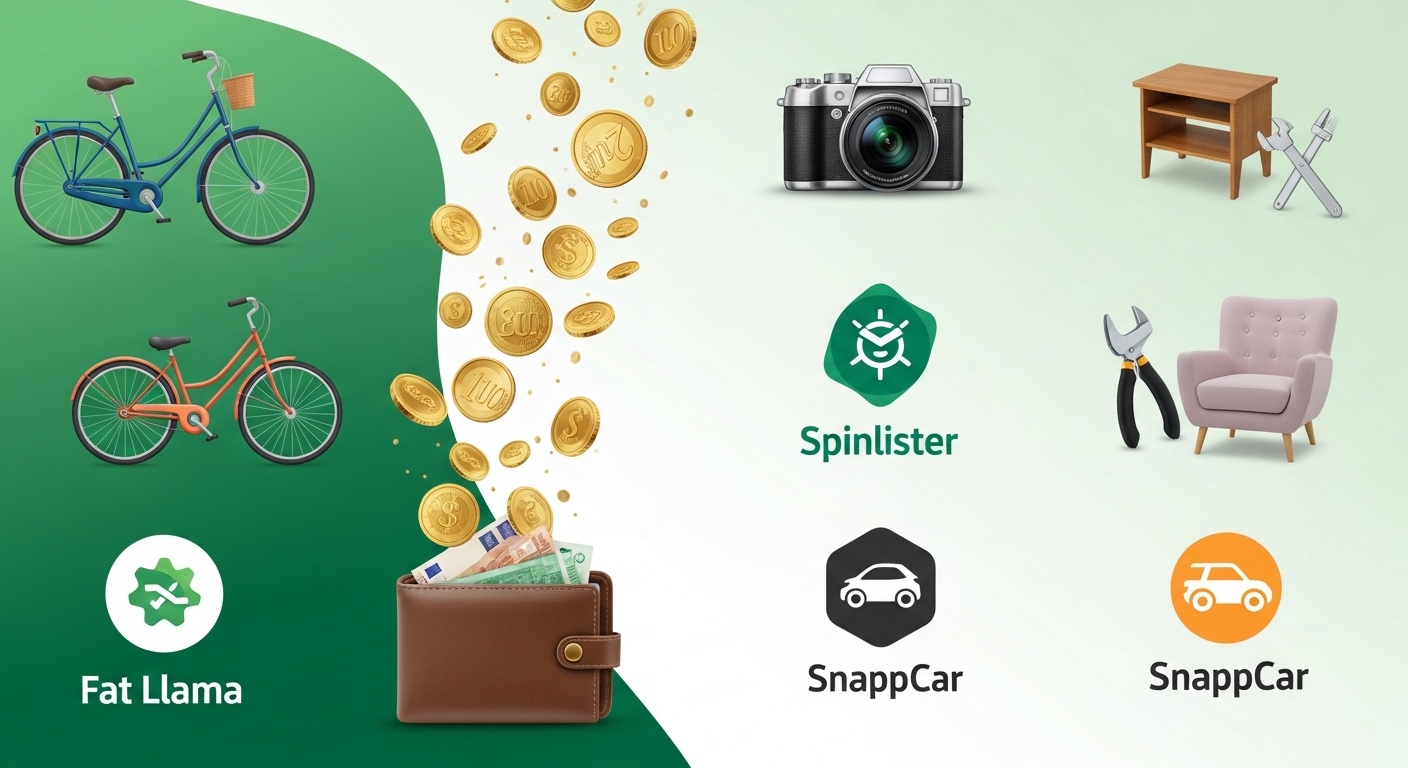
- Bike? → Spinlister
- Camera, drone, or audio gear? → Fat Llama
- Car (and you are in the Netherlands or Germany)? → SnappCar
- Power tools or DIY equipment? → RentMyItems or Peerby
- General items in the Netherlands or Belgium? → Peerby
Create an account on one platform. Do not spread across five platforms at the start — learn one system, get your first rentals and reviews, then expand if the demand is there.
Step 3 — Create a Listing That Gets Bookings
Your listing is your shop window. Everything a potential renter knows about your item comes from what you write and photograph. A listing with good photos and a clear description will be booked. A listing with dark, unhelpful photos will not.
Photos first — they matter most.
Before photographing anything, clean it. A clean item looks well-maintained. A dusty or dirty item looks neglected and makes renters nervous. Then:
- Photograph in natural light, near a window or outdoors
- Use a plain or attractive background — a bike against a park wall, a camera on a desk, tools laid out neatly
- Take multiple angles: the full item, specific features, any accessories included, and any minor existing marks or scratches
- Show the item in a realistic context where possible — a bike being ridden, a camera with a lens attached
Write a description that answers every question.
Your description should remove every reason for a renter to hesitate. Cover:
- Brand and model
- Current condition (be honest — mention any small existing scratches; renters appreciate honesty and it protects you from disputes)
- What is included (charger? bag? helmet? case? all accessories should be listed)
- Pickup arrangements (where, and how flexible you are with timing)
- Your requirements (deposit through the platform, ID, anything else)
Here is an example of a listing description that works:
“Trek mountain bike, medium frame, excellent condition. Used occasionally for city riding. Includes lock, front and rear lights, and a basic puncture kit. €15 per day, €50 deposit through the platform. Pickup in Dublin city centre — flexible on timing. Happy to answer any questions before you book.”
That is 55 words. It tells the renter everything they need to know and nothing unnecessary.
Step 4 — Price Your Item to Get Started
The most common pricing mistake is starting too high. A listing with no reviews and a premium price gets ignored. A listing with no reviews and a competitive price gets booked — and once you have reviews, you can raise the price.
How to find the right starting price:
Search your platform for items similar to yours — same type of item, similar condition, same city or region. Note the price range. Then price your listing 10 to 20 percent below the middle of that range for your first month.
Once you have three or four positive reviews, raise your price to match the market rate. Once you have ten or more strong reviews, you can price above average and still attract bookings.
An simple profit calculation for a bike: Factor Amount Original purchase price €400 Daily rental rate €15 Days rented per month 10 Gross monthly income €150 Platform fee (~12%) €18 Monthly net profit €132 Months to recover purchase cost ~3 months
After three months, the bike has paid for itself. Every subsequent rental is pure profit from an item you still own and can continue renting or use yourself.
Step 5 — Handle Every Renter Professionally
First impressions set the tone for the whole experience — and for the review the renter will leave afterwards.
When someone contacts you:
- Reply within a few hours, not the next day
- Answer every question clearly and honestly
- Confirm pickup time and location explicitly — not “around midday,” but “12:00 at the café on X Street”
At pickup:
- Meet somewhere accessible — a café, a train station, or your building entrance
- Check ID if the platform supports it
- Take photos of the item together with the renter before handing it over. Do this openly — it is standard practice and protects both of you
- Walk through any relevant instructions (especially for tech items like cameras or drones)
- Be friendly. Renters who have a pleasant experience with the owner leave better reviews
At return:
- Inspect the item carefully before the renter leaves
- If everything is fine, confirm it is, and release the deposit through the platform
- Ask politely for a review — something like “I’d really appreciate it if you could leave a quick review when you have a moment”
Step 6 — Grow From Your First Rental
After your first successful rental, two things happen: you understand how the process works in practice, and you have at least one review that will help the next renter trust you.
From here:
- Review your listing based on what the renter asked — if they had questions not answered in your description, add those answers
- Consider listing a second item if you have one worth renting
- Check your seasonal timing — are there periods coming up when demand for your item will peak?
The second rental is always easier than the first. The tenth rental is almost effortless.
How to Stay Safe When Renting Your Belongings
The first question most people have is: what if something goes wrong? What if it gets damaged, or stolen, or returned in worse condition than it left?
These concerns are legitimate. Here is how to approach them practically.
Insurance: Read the Actual Terms
Every established platform includes some form of insurance or protection. But the marketing description of that coverage is never the full story. Read the full insurance terms — specifically:
- What types of damage are covered?
- What is the maximum payout per claim?
- Is theft covered, and under what conditions?
- What is the excess (the amount you pay before the insurance covers the rest)?
- What documentation do you need to make a claim?
Understanding this before your first rental means you know exactly what situation you are in if something happens.
Deposits Are Not Optional
Always take a deposit through the platform — never as a separate cash arrangement. Platform-held deposits mean the money exists and is accessible if there is damage. A cash deposit relies entirely on the renter’s honesty.
The deposit amount should reflect the risk. A drill might warrant a €50 deposit. A camera body might warrant €200. Check what similar listings on your platform use as a standard.
Screen Your Renters
Most platforms provide renter profiles, ID verification status, and previous reviews. Look at these before accepting a booking.
- Has the renter been verified by the platform?
- Do they have any previous reviews, and what do those say?
- Does their request make sense? (A tourist asking to rent a camera for a weekend is normal. Someone with no profile, no reviews, and an unusual request deserves more caution.)
Trust your instincts. Platforms make it easy to decline a booking request. If something feels wrong, decline and wait for the next one.
Photo Evidence at Pickup and Return
This is the single most protective step you can take. When you hand over your item, photograph it together with the renter — both of you visible with the item. When it is returned, photograph it again immediately.
If there is a dispute about damage, your photo taken at pickup is proof of the item’s condition when it left you. Without that, disputes become complicated.
Clear Agreements on Time and Conditions
Every problem that comes from a rental — items returned late, confusion about what was included, misunderstandings about what the rental covered — comes from unclear communication at the start. Be specific about:
- The exact return time (not “by evening” — “by 18:00”)
- What accessories are included and must be returned
- What counts as acceptable use versus misuse
- What happens if they need to return late
Writing this in your listing and confirming it in your pre-rental message takes five minutes and prevents most problems.
What Rents Best in Different Seasons
Item rental is seasonal. Knowing when demand peaks for your specific item helps you time listings, set seasonal prices, and plan around your own use.
Spring and Summer (March–August):
- Bikes — peak demand as weather improves and tourists arrive
- Camping equipment — tents, sleeping bags, cooking gear
- Surfboards and water sports equipment in coastal areas
- Outdoor party equipment — speakers, picnic gear, gazebos
Autumn and Winter (September–February):
- Ski and snowboard equipment near mountain areas
- Camera gear — Christmas events, family gatherings, parties
- Indoor audio-visual equipment — projectors, sound systems
- Luggage — people travelling for Christmas and New Year
Year-round:
- Power tools and DIY equipment — home improvement never stops
- Cameras and photographic equipment — always in demand
- Drones — increasingly popular regardless of season
- Suitcases and travel bags — travel happens all year
If you own seasonal items, plan to list them one or two weeks before their season peak. Renters who plan ahead book early, and being listed when demand first rises gives you priority over later listings.
Tips to Earn More and Avoid Common Mistakes
Mistakes That Catch Beginners Out
Poor listing photos. The first listing of the bike described in this article had dark photos taken indoors against a cluttered background. Two weeks passed with no bookings. New photos taken outdoors on a sunny day: booked the following day. The item did not change. Only the photos did.
Not reading the insurance terms. Someone who rented out a camera without reading the platform’s insurance policy discovered afterwards that the specific type of damage the item suffered was excluded from coverage. The insurance existed — it just did not cover that situation. Read everything before your first rental.
Forgetting accessories. A camera rented without its charger is a camera the renter cannot use. List every accessory explicitly, create a physical checklist to use at pickup, and confirm at handover that everything is present. Preventing this problem takes 30 seconds. Solving it after the renter has left takes much longer.
Unclear return times. “By evening” is not a return time. “By 18:00 at the same location” is a return time. The more specific you are, the fewer misunderstandings you will have.
Starting with too high a price. New listings with no reviews at premium prices get ignored. Build your reputation first at a competitive price, then raise it as your reviews accumulate. Patience at the start creates the foundation for better earnings later.
Tips That Improve Your Results
Be the easiest person to rent from. Respond quickly, be flexible where you reasonably can, confirm details clearly, and show up on time. Renters choose you over other listings partly because of what you are renting and partly because of how you communicate. Easy and friendly wins repeat renters and better reviews.
Bundle accessories for a higher price. A camera rented alone for €25 per day could be rented with a tripod, an extra battery, and a bag for €35 per day. The accessories cost you nothing extra in terms of the rental process, but they add meaningful value — and price — to the transaction.
List on weekdays and check demand on weekends. Many renters book a few days in advance. Having your listing active and fresh during the week means catching bookings for the following weekend, which is often the highest-demand period.
Charge more at weekends. Some platforms allow variable pricing. A bike at €15 per day on weekdays can reasonably be €20 per day on weekends when demand from tourists and leisure users peaks.
Keep every item in excellent condition. After each rental, clean the item, check for any new marks or damage, charge any batteries, and replace anything that was used. A well-maintained item photographs better, earns better reviews, and justifies higher prices over time.
Ask for reviews politely and consistently. After every successful return, send a short message: “Really glad it went well — if you have a moment, a quick review would mean a lot.” Most satisfied renters are happy to leave one but will not think to do it unprompted.
A Note on Local Rules and Taxes
Rules vary by country and sometimes by city. Before renting, check a few things specific to your situation.
Car rental in some cities — Amsterdam is a notable example — requires a permit to rent your car to others, even through a platform. Check your city’s rules before listing a vehicle.
Rental income is generally taxable in every European country, though the thresholds for small amounts vary. Keep a simple record of what you earn and what you spend on maintaining your rental items (cleaning materials, minor repairs, accessories). When in doubt, ask in local expat or creator groups — other renters in your country will know the current rules.
Home insurance typically does not cover items damaged while rented to a third party. In most cases, the platform’s insurance handles this, but confirm that your home policy does not create any complications by checking with your provider.
And Now, What To Do Next?
The items sitting unused in your home right now are either earning nothing or they are earning what you choose to make them earn.
The model is simple: identify what you own but rarely use, list it on the right platform, handle renters well, and collect the income. The item returns. It rents again.
Over time, a bike, a camera, a set of tools, and a spare suitcase become a collection of small income sources that run quietly in the background of your life — requiring occasional attention but no ongoing effort.
Here is where to start this week:
- Walk through your home and write down three items you have not used in the last two weeks
- Look up which platform fits each item — Spinlister for bikes, Fat Llama for cameras, RentMyItems for tools
- Read that platform’s insurance terms before doing anything else
- Create your first listing with clean photos and a clear description
- Set a price 10–15% below the market average to get your first booking and your first review
The first rental will feel uncertain. That is normal. By the third, it is just a system that runs alongside your regular life.
Your belongings are already there. Someone nearby needs them. All you need to do is make that connection.
What item are you thinking of renting out? Drop a comment — it helps other readers see what is possible, and you might get useful advice from someone who has already rented the same thing.
EuroSideHustle helps people in Europe — including immigrants and beginners — build real income online. Explore more guides at EuroSideHustle.com.